

Master the art of Laminated Dough: A Step-by-Step Guide
The allure of freshly baked pastries-the flaky, buttery layers of croissants, the delicate crunch of danish pastries-can evoke memories of quaint patisseries and bustling bakeries. But did you know that the magic behind these delectable treats lies in a technique known as laminated dough? This culinary wonder involves the delicate dance of layering dough and butter, creating sumptuous results that are nothing short of gastronomic poetry. In this step-by-step guide, we invite you to embark on a journey through the enchanting world of laminated dough. Whether you’re a seasoned baker or a passionate novice, we’ll unveil the secrets to mastering this art form, equip you with essential techniques, and provide insights into the science that makes these pastries rise to perfection. Get ready to roll up your sleeves, as we delve into the layers of flavor, texture, and joy that await you in your very own kitchen!
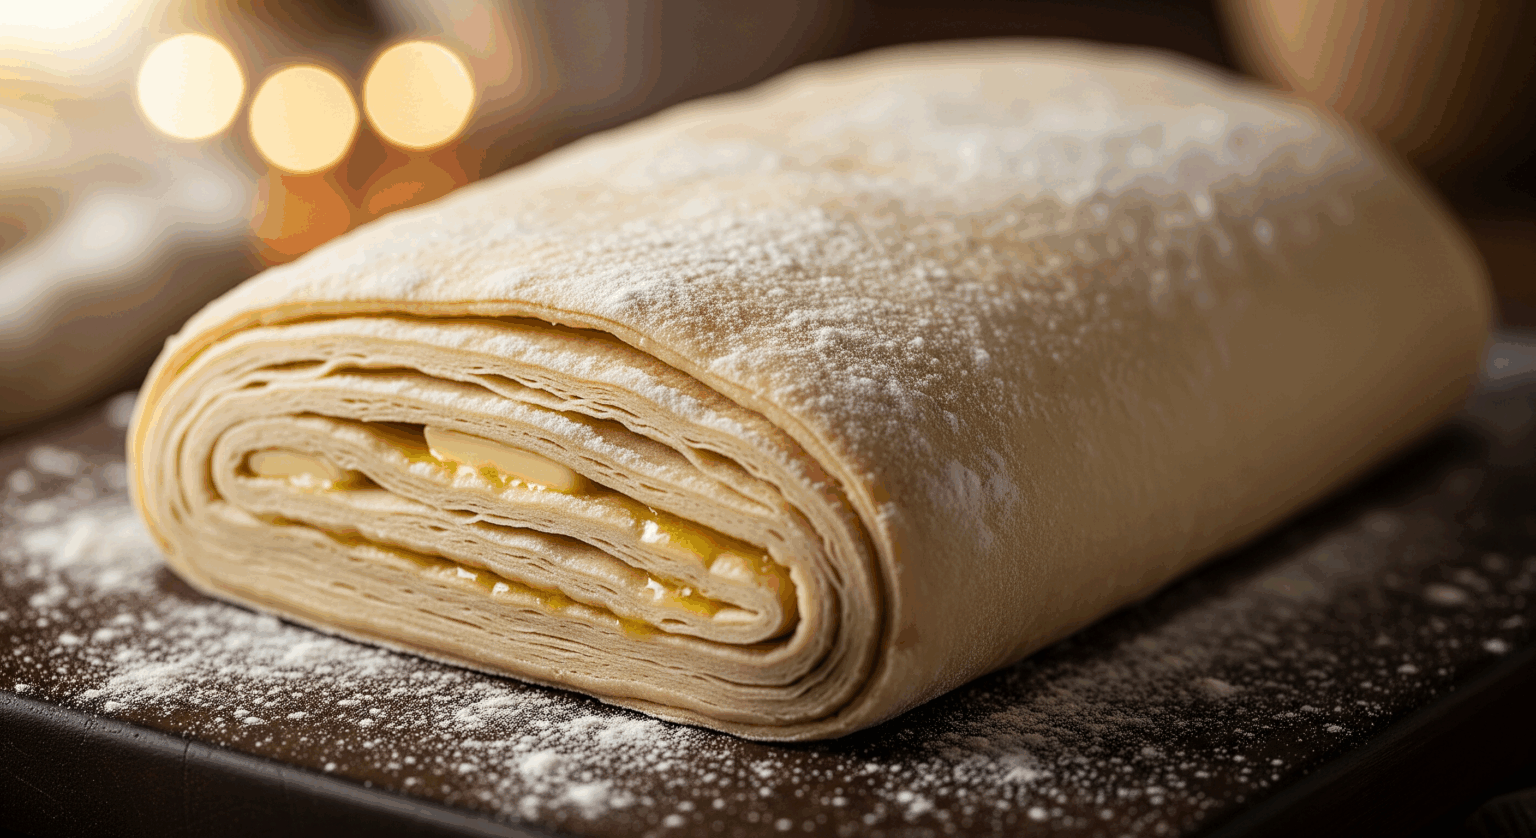
Perfecting Your Ingredients for Flaky Perfection
Mastering the art of laminated dough requires a deep understanding of the ingredients that contribute to its texture and flavor. The Focus Keyword is perfect to encapsulate what it means to create a beautifully flaky pastry that is not only appetizing but visually stunning.
The Science Behind Lamination Techniques
When it comes to flaky perfection, it’s all about the balance between flour, water, and fat. All-purpose flour is your best friend here-it provides the right amount of gluten, ensuring the structure holds as the layers puff up during baking. the water in your dough is crucial; hydration activates the gluten and creates steam during the baking process, which helps separate those lovely layers.
Butter is the star player in lamination techniques. High-fat butter (around 82% fat content) works wonders as it melts and creates steam while also enriching the dough with flavor. For those who prefer non-dairy alternatives,avocado or coconut oil can be experimented with,but keep in mind they may change the texture slightly.
Essential Tools and equipment for Mastery
- High-quality mixing bowl
- Rolling pin (preferably a french-style for better control)
- Bench scraper for precise shaping
- Ruler to measure dough thickness
- Parchment paper for non-stick layering
- Pastry brush for egg washes
- Sharp knife or dough cutter for clean edges
Common Pitfalls and How to Avoid Them
creating laminated dough can be a rewarding process, but beginners often face a few common pitfalls. Here are some tips to steer clear of these challenges:
- Inconsistent dough temperature: Ensure that your ingredients (especially butter) are at the right temperature-soft but not melted. Cold butter maintains its shape during the initial rolling stages.
- Overworking the dough: The gluten in the flour is your ally; however, too much manipulation can lead to tough pastry. Keep your folds gentle and work in a cool environment.
- Insufficient chill time: Don’t rush the chilling periods. These pauses are what create those beautiful layers and pockets of steam. Patience is key!
Prep and Cook Time
Prep Time: 30 minutes (plus chilling time)
Cook Time: 25-40 minutes, depending on recipe
Yield
Approximately 8 servings, depending on the specific pastry cut
difficulty Level
Medium – a bit of practice will elevate your skills!
Ingredients
- 2 ½ cups all-purpose flour, sifted
- 1 teaspoon salt
- 1 tablespoon sugar
- 1 cup cold unsalted butter (diced into cubes)
- ¾ cup ice water
Instructions
- In a large mixing bowl, combine flour, salt, and sugar. Mix well using a whisk.
- Add the cold butter cubes into the flour mixture. Using a pastry cutter, mix until the mixture resembles coarse crumbs-about the size of peas.
- Gradually add the ice water, mixing just until the dough holds together. Do not overmix!
- Shape the dough into a flat rectangle, wrap in plasticwrap, and refrigerate for at least 30 minutes.
- Roll out the chilled dough on a floured surface to form a rectangle twice as long as it is wide.Start with gentle pressure to avoid breaking the butter pieces.
- Fold the dough into thirds, like a letter. This is your first fold. Wrap tightly and refrigerate for another 30 minutes.
- repeat the rolling and folding process two more times, chilling between folds.Aim for at least three folds for optimum flakiness.
- Once complete,roll out and shape into your desired pastry,then proceed with baking instructions specific to your recipe.
Chef’s Notes
Variations: Try adding spices or zest into the dough for added flavor!
Substitutions: If you don’t have unsalted butter, just adjust the salt in your dough accordingly.
common Troubles: If your dough is too sticky, add a little flour to your work surface and hands. If it cracks while rolling, let it rest a bit longer.
Make-Ahead: You can freeze the laminated dough. Just wrap it tightly in plastic wrap and store in an airtight container for up to two months!
Serving Suggestions
Serve warm for the best experience! For pastries like croissants or danishes, consider a light glaze of simple syrup.A sprinkle of confectioner’s sugar also works wonders for a festive touch. Pair with fresh fruit preserves or a dollop of whipped cream for an extra special treat.
| Nutritional Information | Per Serving |
|---|---|
| Calories | 250 |
| Protein | 3g |
| Carbohydrates | 36g |
| Fat | 12g |
Q&A
Q&A: Master the Art of Laminated Dough
Q1: what exactly is laminated dough, and why is it so special?
A1: Laminated dough is a pastry technique that involves folding layers of dough and butter together, creating a light, flaky texture that’s simply irresistible. Think croissants, Danish pastries, and some exquisite puff pastries! The magic lies in the layers-each fold and roll traps air, which expands when baked, resulting in a beautifully risen, crisp outer layer.
Q2: What are the key ingredients I need to get started?
A2: To master laminated dough,you’ll need a handful of basic ingredients: all-purpose flour,salt,water,yeast (for some recipes),unsalted butter,and a pinch of sugar.Make sure to choose high-quality butter, as its flavor greatly impacts the final product. Remember, the quality of your ingredients shines in every layer!
Q3: What are the essential tools for working with laminated dough?
A3: You’ll want to equip yourself with a rolling pin, a sharp knife or pastry cutter, a ruler (for precision!), and a clean work surface-preferably marble or wood to keep the dough cool. A pastry brush will also be handy for applying egg washes or melted butter. Don’t forget a trusty baking sheet or stone for that perfect bake!
Q4: Can you break down the steps involved in making laminated dough?
A4: Absolutely! First, prepare your dough by mixing your flour, salt, water, and yeast until combined. Let it rest for a bit. next, create a block of butter by pounding it into a flat rectangle. Now comes the fun part: encase the butter in your dough and start rolling! Fold and turn your dough several times, chilling it between turns to keep the butter from melting. Each fold creates additional layers, and after several repetitions, you’ll have a spectacularly flaky dough ready for baking.
Q5: What are some common mistakes to avoid when making laminated dough?
A5: Great question! One common pitfall is using butter that’s too soft, which can lead to a greasy dough instead of those delicate layers. Also, avoid overworking the dough-keep it cool and handle it gently! Lastly, make sure to follow chill times strictly; patience is key for achieving that perfect rise and flakiness.
Q6: How can I experiment with flavors and fillings for my laminated dough creations?
A6: Get creative! For sweet versions, consider adding spices like cinnamon or nutmeg, or incorporate chocolate, fruits, or nuts as fillings. For savory options, try cheeses, herbs, or vegetables. Just remember to balance flavors-fillings should complement the buttery dough without overpowering it!
Q7: What tips do you have for storing baked laminated goods?
A7: Baked laminated pastries are best enjoyed fresh, but if you need to store them, let them cool entirely, then keep them in an airtight container at room temperature for a day or two. If you want to enjoy them at a later date, consider freezing them after baking and reheat in an oven to restore their crispy texture. Just avoid the microwave unless you want a chewy pastry!
Q8: lastly,how can I celebrate my laminated dough creations?
A8: Once you’ve perfected your laminated dough,share the love! Host a brunch where friends can marvel at your flaky triumphs or create a themed pastry board showcasing different fillings.don’t forget to snap some shots for the ‘gram-your hard work deserves to be celebrated and shared with the world!
Mastering laminated dough may take practice, but with these tips and tricks, you’ll be on your way to creating stunning, buttery pastries that will impress anyone lucky enough to taste them. Happy baking!
Closing remarks
As we reach the final fold of our laminated dough journey, it’s clear that mastering this intricate art form is not just about baking; it’s about embracing patience, precision, and the pleasure of creating something truly delectable. With this step-by-step guide in hand, you’re now equipped to layer your way to the flakiest croissants, the most tender Danishes, and the most indulgent pastries that will delight your taste buds and impress your loved ones.
Remember, each roll and fold is a dance between craft and chemistry, where warmth and time collaborate to create the edible magic we call pastries.So don your apron,let your creativity rise,and don’t shy away from experimentation.Whether you’re an experienced baker or just embarking on your culinary adventures, the world of laminated dough awaits with a host of buttery delights ready to be explored.
So, preheat your oven, gather your ingredients, and start folding your way to flaky perfection. Your kitchen will become a haven of aromatic pastries, and with every bite, you’ll savor the rewards of your artistry. Happy baking, and may your laminated dough journeys be endlessly delicious!
![]()
![]()