
Mastering the Electric Roaster: perfect Turkey Every Time!
As the holiday season approaches, the savory aroma of a perfectly roasted turkey wafts through homes, signaling the arrival of cherished gatherings and feasts. Yet, for many home cooks, the quest for the ideal turkey can feel daunting-an elaborate dance of time, temperature, and technique. Enter the electric roaster, a culinary marvel that promises to streamline yoru roasting experiance while delivering juicy, golden-brown results. In this article, we will embark on a journey to master the electric roaster, unlocking the secrets to achieving that perfectly succulent turkey every single time. Whether you’re a seasoned chef or a curious beginner, discover the tips, tricks, and essential techniques that will elevate your holiday cooking and impress your guests, turning a simple meal into a memorable celebration. Get ready to make this year’s gathering one for the books as we delve into the art of roasting wiht the electric roaster!
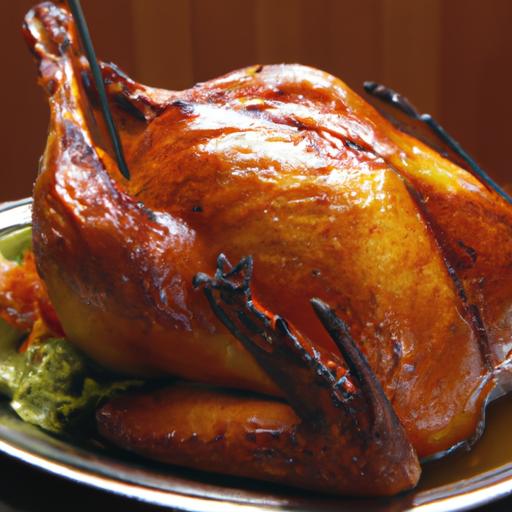
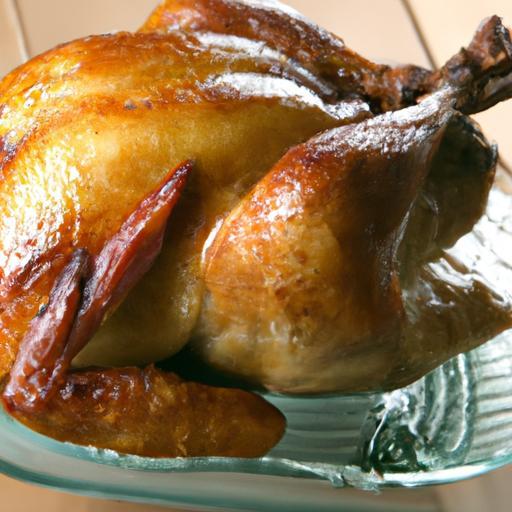
Mastering the electric roaster can elevate your culinary prowess, especially when it comes to preparing a holiday turkey that’s juicy and flavorful. Electric roasters are not just convenient; they also help to retain moisture while enhancing the flavors of your bird. The combination of precise temperature control and even heat distribution ensures a perfect roast, making this technique an essential for your upcoming feast. Let’s dive into the details of successfully choosing the right electric roaster and employing best practices for achieving turkey perfection this holiday season.
Prep and Cook Time
Prep Time: 30 minutes
Cook time: 3 to 4 hours
Total Time: 3.5 to 4.5 hours
Yield
Serves 8-10 people.
Difficulty Level
Medium
Ingredients
- 1 (12-14 pound) whole turkey, thawed
- 1/2 cup unsalted butter, softened
- 2 tablespoons olive oil
- 4 cloves garlic, minced
- 1 tablespoon fresh rosemary, chopped
- 1 tablespoon fresh thyme, chopped
- 1 tablespoon fresh sage, chopped
- 1 tablespoon salt
- 1 teaspoon black pepper
- 2 cups low-sodium chicken broth
- 1 lemon, quartered
- 1 onion, quartered
- Carrots and celery, for stuffing (optional)
Instructions
- Start by preheating your electric roaster to 325°F (163°C) while prepping your turkey.
- In a medium bowl, blend butter, olive oil, minced garlic, rosemary, thyme, sage, salt, and black pepper to create a fragrant herb mixture.
- Pat the turkey dry with paper towels to ensure a crispy skin.
- Gently loosen the turkey skin over the breast area and carefully spread about half of the herb mixture under the skin.
- Rub the remaining herb mixture all over the outside of the turkey for an even flavor.
- Stuff the cavity with lemon, onion, and optional vegetables like carrots and celery to add even more flavor.
- Place the turkey breast-side up on the roasting rack in the electric roaster.
- Pour the chicken broth into the bottom of the roaster to keep moisture levels high during cooking.
- Close the lid and roast for approximately 3 to 4 hours, or until the internal temperature reaches 165°F (74°C) in the thickest part of the thigh.
- If desired, baste the turkey with the pan juices every hour to promote even browning.
- Once done, carefully remove the turkey from the roaster and allow it to rest for at least 20-30 minutes before carving.
Chef’s Notes
- For an added twist, substitute the herb blend with spices like smoked paprika or cumin for an unexpected flavor profile.
- You can make the herb butter a day ahead to deepen the flavors; just keep it covered in the refrigerator.
- If the turkey browns too quickly, tent it with aluminum foil.
- To ensure a juicy turkey, let it rest before carving, as this allows the juices to redistribute throughout the meat.
- This recipe can be prepared a day in advance; just reheat the sliced turkey gently in the oven with a few broth splashes to keep it moist.
Serving Suggestions
Present your beautifully roasted turkey on a rustic wooden platter or a festive serving board surrounded by sprigs of fresh herbs and seasonal fruits for an inviting display. To elevate your presentation,consider garnishing with orange slices and pomegranate seeds for a pop of color. Serve alongside classic sides like creamy mashed potatoes, sweet cranberry sauce, and savory stuffing for a complete holiday meal.
| Nutritional Information | Per Serving |
|---|---|
| calories | 350 |
| Protein | 25g |
| Carbs | 0g |
| Fat | 28g |
Q&A
Mastering the Electric Roaster: Perfect Turkey every Time!
Q1: What is an electric roaster, and why should I consider using one for cooking turkey?
A1: An electric roaster is a versatile cooking appliance that functions like an oven but is often more compact and energy-efficient. It excels in roasting large cuts of meat, like turkey, and is especially useful during holidays when oven space is at a premium. With precise temperature control and the ability to retain moisture, electric roasters can definitely help you achieve a perfectly cooked, juicy turkey with minimal fuss.
Q2: Can I fit a whole turkey in an electric roaster? What size should I consider?
A2: Most electric roasters accommodate whole turkeys ranging from 10 to 22 pounds, depending on the model. When selecting an electric roaster, it’s crucial to check its capacity specifications to ensure your turkey fits comfortably without overcrowding. A good guideline is to opt for a roaster that offers at least one pound of capacity for every inch of turkey length.
Q3: How do I prepare my turkey for roasting in an electric roaster?
A3: Preparing your turkey is an essential step to ensure it turns out succulent and flavorful. Start by thawing your turkey fully if it’s frozen; this could take several days in the fridge. Remove the giblets and neck, then rinse the turkey inside and out under cold water.Pat it dry with paper towels. Next, season the turkey generously with your favorite herbs and spices, and consider brining or marinating it beforehand to enhance flavor and moisture.
Q4: What temperature should I roast my turkey at in an electric roaster?
A4: For optimal results, set your electric roaster to 325°F (163°C). This temperature allows the turkey to cook evenly throughout without drying out the meat. Always refer to your roaster’s manual,as some may have specific temperature guidelines or recommendations for different types of meat.
Q5: How long does it typically take to cook a turkey in an electric roaster?
A5: Cooking times in an electric roaster can vary based on the turkey’s weight. As a general rule, allow about 13 to 15 minutes of cooking time per pound. For a more precise check, use a meat thermometer to ensure the turkey reaches an internal temperature of 165°F (74°C) in the thickest part of the thigh. This guarantees that the turkey is fully cooked and safe to eat.
Q6: Can I add vegetables or other ingredients to the electric roaster while cooking the turkey?
A6: absolutely! Adding vegetables like carrots, onions, and celery to the bottom of the roaster can create a flavorful broth as the turkey cooks. Not only will this enhance the taste of the turkey, but it can also provide a delicious side dish. just be cautious not to overcrowd the roaster, as you want to ensure that the turkey has ample space for even cooking.
Q7: What should I do after the turkey is done cooking in the electric roaster?
A7: Once your turkey reaches the target internal temperature, it’s time to take it out of the roaster. Carefully transfer the turkey to a cutting board and let it rest for at least 20-30 minutes. Resting allows the juices to redistribute, ensuring each slice is tender and juicy. While the turkey rests, you can also use the drippings at the bottom of the roaster to make a delicious gravy.
Q8: What tips can you provide for cleaning and maintaining my electric roaster?
A8: After your delectable turkey feast, unplug your electric roaster and allow it to cool. Most electric roasters have removable inserts that are dishwasher-safe, but hand-washing with warm, soapy water is also effective. Be sure to wipe the exterior and clean any stubborn residues with a damp cloth. Regular maintenance will keep your roaster in prime condition for many delicious meals to come!
Q9: Any final tips for mastering the electric roaster for turkey cooking?
A9: Absolutely! Don’t be afraid to experiment with flavors and techniques. Layering herbs, garlic, and butter beneath the turkey skin can create a flavor explosion. Additionally,use aluminum foil to cover the turkey if it begins to brown too much during cooking. With practice and a little creativity, you’ll be the proud master of your electric roaster, serving up perfect turkeys time and time again!
Key Takeaways
As we close the lid on our journey through the world of electric roasting, it’s clear that mastering this culinary art form can transform your turkey from ordinary to extraordinary-right from the comfort of your kitchen. With the tips and techniques we’ve explored, you can confidently approach every holiday feast, ensuring that your turkey emerges golden, juicy, and bursting with flavor, time and time again.
remember, the beauty of the electric roaster lies not only in its efficiency but also in the opportunity it provides to experiment with flavors and techniques.Embrace your creativity, try out new seasoning blends or marinades, and make each turkey your own signature masterpiece.
So, whether you’re feeding a crowd or enjoying an intimate gathering, gather your ingredients, set your temperatures, and let the electric roaster take care of the rest.With each roast, you’ll not only hone your skills but also create lasting memories around the dinner table. Here’s to many more delicious holidays-may your turkeys forever be moist and your gatherings filled with joy! happy roasting!