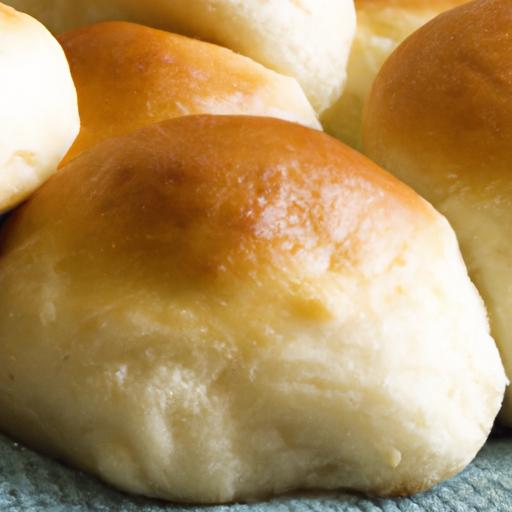

Warm and Fluffy: Mastering Your perfect Homemade Dinner Rolls
Picture this: the sun sets over a bustling kitchen,the rich aromas of a home-cooked meal wafting through the air. amidst the clattering of pots and the sizzling of ingredients, there’s one element that stands out above all-a basket overflowing with warm, fluffy dinner rolls. Their golden crust and soft, pillowy interior invite hungry guests to grab one (or two) with eager hands. Homemade dinner rolls aren’t just a side dish; they’re a warm embrace, a symbol of care and comfort. In this article, we invite you on a delightful journey to mastering the art of crafting the perfect homemade dinner rolls. Whether you are a seasoned baker or a novice in the kitchen, we’ll break down the steps, share expert tips, and reveal secret ingredients that elevate these rolls from ordinary to exceptional. So, roll up your sleeves, dust off that mixing bowl, and let’s get started on creating the mouthwatering rolls that will make every dinner feel like a special occasion!
Warm and Fluffy: Mastering Your Perfect Homemade Dinner Rolls
Warm and fluffy homemade dinner rolls are the ultimate comfort food, transforming any dinner table into a welcoming feast.The joy of biting into a soft, slightly warm roll, slathered in butter is something that evokes feelings of warmth and togetherness. this recipe stems from my family’s tradition of gathering around the table, sharing stories, and savoring each bite of these delectable rolls. Here, we’ll delve into the art of dough, from choosing the right ingredients to achieving the perfect bake, ensuring that your dinner rolls are not just a side dish but the star of your meal.
Prep and Cook Time
- Prep Time: 2 hours (includes rising)
- Cook Time: 20 minutes
Yield
- 12 rolls
Difficulty Level
- Easy
Ingredients
- 4 cups all-purpose flour,sifted
- 2 tablespoons sugar
- 1 packet (2¼ teaspoons) active dry yeast
- 1 teaspoon salt
- 1 cup warm milk (110°F/43°C)
- ¼ cup unsalted butter,melted
- 2 large eggs,at room temperature
- Extra melted butter,for brushing on top
Instructions
- In a small bowl,dissolve the yeast and sugar in the warm milk. Let it sit for about 5-10 minutes until frothy to ensure the yeast is active.
- In a large mixing bowl, combine the sifted flour and salt. Make a well in the center and add the yeast mixture, melted butter, and eggs.
- Mix until a dough begins to form.Then, knead the dough on a floured surface for about 8-10 minutes until it becomes smooth and elastic.
- Place the kneaded dough in a lightly oiled bowl, cover it with a damp cloth, and let it rise in a warm place until it has doubled in size, about 1 hour.
- After the dough has risen, punch it down to release air and divide it into 12 equal pieces. Shape each piece into a ball.
- Arrange the balls in a greased baking dish, ensuring they are touching slightly for soft sides. Cover and let them rise for another 30-45 minutes.
- Preheat your oven to 375°F (190°C). Once the rolls have risen, brush the tops with extra melted butter.
- Bake for 20-25 minutes, or until golden brown on top.The rolls should sound hollow when tapped on the bottom.
- Remove from the oven and brush with more melted butter for extra richness. let cool slightly before serving.
Chef’s Notes
To ensure your rolls are always perfect, try these tips for success:
- For an enhanced flavor, you can substitute half of the all-purpose flour with bread flour; it increases the gluten content, resulting in fluffier rolls.
- If you want to make-ahead,prepare the dough,shape the rolls,and place them in the fridge overnight. Let them come to room temperature and rise for about an hour before baking.
- For an extra-special touch,add herbs or garlic powder to the dough for savory rolls,or mix in some grated cheese.
- Keep an eye on your oven as temperatures can vary; use an oven thermometer if possible.
Serving Suggestions
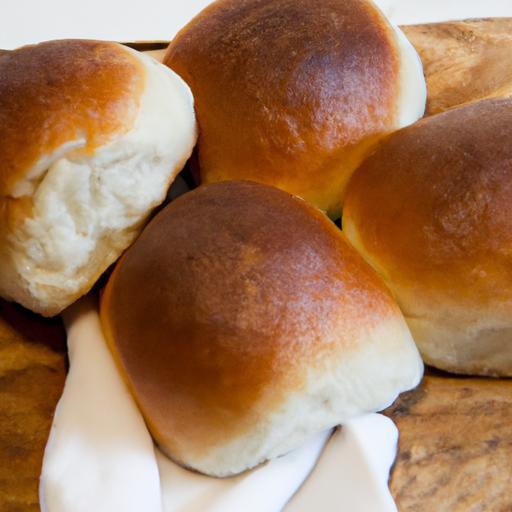
these rolls are best served warm, with a side of creamy butter or your favorite jam. For a rustic touch, place them in a beautiful basket lined with a cloth napkin. Pair them with hearty dishes like pot roast, soups, or a fresh garden salad for a complete meal experience. They also make excellent sliders for lunch the next day-just slice them in half and fill with your favorite fillings!
| Nutritional Information |
|---|
| Calories: 180 |
| Protein: 4g |
| Carbs: 28g |
| Fat: 6g |
If you love baking, check out our article on how to create the perfect sourdough starter, and elevate your baking skills even further!
For more baking tips, visit King Arthur Baking Company, a credible source for all things baking.
Q&A
Q&A: Warm and Fluffy: Mastering Your Perfect Homemade Dinner Rolls
Q1: What makes homemade dinner rolls so special compared to store-bought options?
A1: Homemade dinner rolls carry a unique charm that store-bought versions simply can’t replicate. The warm, fragrant anticipation that fills your kitchen while they bake creates an inviting atmosphere, and the moment you break open that golden crust to reveal soft, fluffy insides is pure magic. Plus, you have full control over the ingredients, allowing you to create rolls that are not only fluffy and flavorful but tailored to your taste and dietary preferences.
Q2: What ingredients do I need to get started on my dinner rolls?
A2: The foundations of fluffy dinner rolls are surprisingly simple! You’ll need: all-purpose flour, warm water, active dry yeast, sugar, salt, and butter (or a substitute for a dairy-free option). Optional additions like herbs, garlic powder, or cheese can elevate the flavor even further. Just remember, the quality of your ingredients will directly impact the taste and texture, so choose wisely!
Q3: How do I know if my yeast is active before I start making the dough?
A3: Ensuring your yeast is alive and kicking is crucial for fluffy rolls! to check the activity, mix the yeast with warm water (around 110°F or 43°C) and a sprinkle of sugar. Let it sit for about 5-10 minutes. If it’s bubbly and frothy, your yeast is active and ready to go! if there’s no reaction, you might want to try a new packet.
Q4: What kneading techniques can help me achieve the perfect dough?
A4: Kneading is where the magic happens! After combining your ingredients, turn the dough onto a lightly floured surface. Use the heel of your hand to push the dough away from you,fold it over itself,and then rotate it a quarter turn. Repeat for about 8-10 minutes until the dough is smooth and elastic. Think of it as a mini workout-your arms will thank you, and your rolls will be delightfully airy!
Q5: Do I really need to let the dough rise twice? What’s the benefit?
A5: Grate question! Letting the dough rise twice might seem like an extra step, but it’s essential for achieving that fluffiness we all crave. The first rise allows the dough to double in size as the yeast works its magic. The second rise is equally notable-allowing the gluten to relax and enabling the rolls to develop flavor and texture. Patience here is key for a delightful outcome!
Q6: Can I prepare the dough in advance and bake it later?
A6: Absolutely! You can prepare the dough ahead of time and refrigerate it after the first rise. This method not only saves time but also enhances the flavor of the rolls. Just remember to bring the dough back to room temperature before shaping and allowing it to rise again for best results. Alternatively, you can also freeze shaped rolls before the second rise; just thaw and let them rise before baking when you’re ready!
Q7: How can I make my rolls extra special for a family gathering?
A7: Elevate your dinner rolls by incorporating additional flavors! You could mix in herbs like rosemary or thyme, or even sprinkle some garlic powder into the dough or on top before baking.for a sweet twist, consider a cinnamon-sugar topping or a swirl of honey butter.The presentation also matters-basket them up with a pretty cloth covering, and your rolls will not only taste wonderful but look inviting too!
Q8: What are some creative ways to serve my homemade dinner rolls?
A8: The beauty of dinner rolls lies in their versatility! Serve them warm alongside a spread of herb-infused butter, garlic butter, or even a fruity jam.For a fun twist, use them as mini sandwiches, filling them with your favorite ingredients for a delightful lunch or snack. The possibilities are endless-these little clouds of joy are just as good on their own!
Q9: Any parting tips for novice bakers trying dinner rolls for the first time?
A9: Embrace the adventure of baking! Don’t rush the process; take your time with each step, from measuring ingredients to kneading the dough. Remember, practice makes perfect-so don’t be discouraged if your first batch isn’t exactly what you envisioned.Enjoy the process, soak up the aromas, and soon you’ll be crafting rolls that leave everyone asking, “What’s your secret?” Happy baking!
to Wrap It Up
as we wrap up this delicious journey into the world of homemade dinner rolls, may your kitchen become a sanctuary of warmth and comfort, where the aroma of freshly baked bread invites loved ones to gather around. Armed with the knowledge of techniques, tips, and variations, you’re now ready to master the art of crafting those warm and fluffy rolls that can elevate any meal. Remember, the secret lies not just in the ingredients, but in the love and care you pour into every knead and rise.
So, roll up your sleeves, unleash your creativity, and let the dough become an extension of your culinary expression. Whether you’re serving them alongside a festive feast or enjoying them as a comforting snack, these rolls will surely bring smiles and satisfaction to your table. So go forth, experiment, and relish the simple joy of sharing homemade bread with friends and family. After all, the heart of every great meal frequently enough begins with that first warm, fluffy roll; let it be yours to master and to share. happy baking!